nmcli device statu      ##查看物理设备
nmcli connection add con-name ens161  ifname ens161 type ethernet     ##添加连接名ens161
nmcli connection add con-name ens224  ifname ens224 type ethernet     ##添加连接名ens224
nmcli connection add con-name ens256  ifname ens256 type ethernet     ##添加连接名ens256

================================节点一上操作==========================================
-------------------------添加public IP-----------------------------------(手打上去)
nmcli connect modify ens161 ipv4.address 172.16.20.101/24 ipv4.gateway 172.16.20.1 ipv4.method manual  autoconnect yes
[root@localhost ~]# nmcli conn up ens161

-------------------------添加private IP-----------------------------------(secureCRT连接)
nmcli connect modify ens224 ipv4.address 192.168.100.101/24 ipv4.gateway 172.16.20.1 ipv4.method manual autoconnect yes
nmcli connect modify ens256 ipv4.address 192.168.200.101/24 ipv4.gateway 172.16.20.1 ipv4.method manual autoconnect yes

[root@localhost ~]# nmcli conn up ens161
[root@localhost ~]# nmcli conn up ens224
[root@localhost ~]# nmcli conn up ens256

================================节点二上操作==========================================
-------------------------添加public IP-----------------------------------(手打上去)
nmcli connect modify ens161 ipv4.address 172.16.20.101/24 ipv4.gateway 172.16.20.1 ipv4.method manual  autoconnect yes
[root@localhost ~]# nmcli conn up ens161

-------------------------添加private IP-----------------------------------(secureCRT连接)
nmcli connect modify ens224 ipv4.address 192.168.100.102/24 ipv4.gateway 172.16.20.1 ipv4.method manual autoconnect yes
nmcli connect modify ens254 ipv4.address 192.168.200.102/24 ipv4.gateway 172.16.20.1 ipv4.method manual autoconnect yes

[root@localhost ~]# nmcli conn up ens224
[root@localhost ~]# nmcli conn up ens256
[root@localhost ~]# hostnamectl set-hostname mysql01    #修改节点一的主机名
[root@localhost ~]# hostnamectl set-hostname mysql02    #修改节点二的主机名
------------------两个节点上都执行---------------
cat <<END>> /etc/hosts
172.16.20.101   mysql01
192.168.100.101 mysql01-pri1
192.168.200.101 mysql01-pri2

172.16.20.102   mysql02
192.168.100.102 mysql02-pri1
192.168.200.102 mysql02-pri2
172.16.20.105   vip
END
----------------------------------------
rm -rf /etc/yum.repos.d/*                                          ##删除yum原来的配置文件
-----------------------------------------
mkdir /software
mount -o loop /software/rhel-8.5-x86_64-dvd.iso /media/            ##挂载光驱

[root@mysql01 /media]# df -Th
文件系统              类型      容量  已用  可用 已用% 挂载点
devtmpfs              devtmpfs  3.8G     0  3.8G    0% /dev
tmpfs                 tmpfs     3.8G     0  3.8G    0% /dev/shm
tmpfs                 tmpfs     3.8G  9.4M  3.8G    1% /run
tmpfs                 tmpfs     3.8G     0  3.8G    0% /sys/fs/cgroup
/dev/mapper/rhel-root xfs        44G   16G   29G   35% /
/dev/sda2             xfs      1014M  251M  764M   25% /boot
/dev/sda1             vfat      599M  5.8M  594M    1% /boot/efi
tmpfs                 tmpfs     777M   28K  777M    1% /run/user/1000
tmpfs                 tmpfs     777M     0  777M    0% /run/user/0
/dev/loop0            iso9660    11G   11G     0  100% /media       ##查看是否挂载。

-------------------------------------------
cat <<END>> /etc/yum.repos.d/baseOS.repo
[BaseOS]
name = os
baseurl = file:///media/BaseOS/
enable = 1
gpgcheck = 0

[AppStream]
name = AppStream
baseurl = file:///media/AppStream/
enable = 1
gpgcheck = 0
END
-----------------------------------------------------------------
yum clean all;yum makecache;                                ##清除旧的信息,创建yum缓存。
----------------------------配置多路径软件-------------------(Dell 存储工程师做)
yum install device-mapper-multipath.x86_64  -y
systemctl enable multipathd --now
mpathconf --enable --with_multipathd y
multipath -v2
multipath -F
multipath -ll
两个节点都要执行
systemctl disable firewalld --now;
sed -i 's/SELINUX=enforcing/SELINUX=disabled/' /etc/selinux/config;
setenforce 0;
[root@mysql01 ~]# lsblk
NAME          MAJ:MIN RM  SIZE RO TYPE MOUNTPOINT
loop0           7:0    0 10.2G  0 loop /media
sda             8:0    0   50G  0 disk
├─sda1          8:1    0  600M  0 part /boot/efi
├─sda2          8:2    0    1G  0 part /boot
└─sda3          8:3    0 48.4G  0 part
  ├─rhel-root 253:0    0 43.4G  0 lvm  /
  └─rhel-swap 253:1    0    5G  0 lvm  [SWAP]
sdb             8:16   0   15G  0 disk
sdc             8:32   0   10G  0 disk
sr0            11:0    1 10.2G  0 rom
[root@mysql01 ~]#


------------------节点一上执行--------------
parted  /dev/sdb mklabel gpt mkpart primary  "1 -1"


mkfs.xfs -K /dev/sdb1;

mkdir /data1; mkdir /data2;
mount /dev/sdb1 /data1;

==============df -Th  =================查看分区情况
cd /data1;touch 111111
umount /data1;


------------------节点二上执行--------------
[root@mysql02 ~]# partprobe
mkdir /data1; mkdir /data2;
mount /dev/sdb1 /data1;
umount /data1;
[root@mysql01 ~]# yum install mysql mysql-server.x86_64  -y;
systemctl start mysqld ;
mysql_secure_installation                 ## 初始化数据库
[root@mysql01 ~]# mysql_secure_installation;

Securing the MySQL server deployment.
Connecting to MySQL using a blank password.

VALIDATE PASSWORD COMPONENT can be used to test passwords
and improve security. It checks the strength of password
and allows the users to set only those passwords which are
secure enough. Would you like to setup VALIDATE PASSWORD component?

Press y|Y for Yes, any other key for No:
Please set the password for root here.

New password:                            ####输入密码

Re-enter new password:                   ####输入密码
By default, a MySQL installation has an anonymous user,
allowing anyone to log into MySQL without having to have
a user account created for them. This is intended only for
testing, and to make the installation go a bit smoother.
You should remove them before moving into a production
environment.

Remove anonymous users? (Press y|Y for Yes, any other key for No) : y     ##移除匿名用户
Success.


Normally, root should only be allowed to connect from
'localhost'. This ensures that someone cannot guess at
the root password from the network.

Disallow root login remotely? (Press y|Y for Yes, any other key for No) :                 ##回车

 ... skipping.
By default, MySQL comes with a database named 'test' that
anyone can access. This is also intended only for testing,
and should be removed before moving into a production
environment.


Remove test database and access to it? (Press y|Y for Yes, any other key for No) : y     ##删除测试数据库
 - Dropping test database...
Success.

 - Removing privileges on test database...
Success.

Reloading the privilege tables will ensure that all changes
made so far will take effect immediately.

Reload privilege tables now? (Press y|Y for Yes, any other key for No) :                  ##回车

 ... skipping.
All done!


[root@mysql02 ~]# mysql -uroot -pAa123456
mysql> show databases;
+--------------------+
| Database           |
+--------------------+
| information_schema |
| mysql              |
| performance_schema |
| sys                |
+--------------------+


systemctl stop mysqld ;
[root@mysql02 /var/lib/mysql]# cat /etc/my.cnf.d/mysql-server.cnf
[mysqld]
datadir=/var/lib/mysql
socket=/var/lib/mysql/mysql.sock
log-error=/var/log/mysql/mysqld.log
pid-file=/run/mysqld/mysqld.pid


mv /var/lib/mysql /var/lib/mysql_bak;
mkdir /var/lib/mysql -p;
mount /dev/sdb1 /var/lib/mysql;
chown mysql:mysql  /var/lib/mysql
chmod -R 755 /var/lib/mysql
cp -va /var/lib/mysql_bak/* /var/lib/mysql/

systemctl start mysqld ;
---------------------------------------------------
mysql -uroot -pAa123456;
show databases;
create database test;
use test;
mysql> insert into t1 values(10,'zhang');

mysql> select * from t1;
+------+------------+
| id   | frist_name |
+------+------------+
|   10 | zhang      |


---------------------------节点二--------------------
mv /var/lib/mysql /var/lib/mysql_bak;
mkdir /var/lib/mysql -p;
mount /dev/sdb1 /var/lib/mysql;
systemctl start mysqld ;

-------------------------测试数据库--------------------------------
mysql -uroot -pAa123456;
show databases;
create database test;
use test;
mysql> insert into t1 values(10,'zhang');

mysql> select * from t1;
+------+------------+
| id   | frist_name |
+------+------------+
|   10 | zhang      |
 yum install tigervnc-server.x86_64  -y
[root@mysql01 ~]# vncserver :1 -geometry 1920x1080
Password:                                 ##输入你的root用户密码
Verify:                                   ##输入你的root用户密码
Would you like to enter a view-only password (y/n)? n
vnc连接测试
[root@mysql01 /software]# ls
rhel-8.5-x86_64-dvd.iso  RoseHA-11.2.0-1804.210416-RHEL8-x86_64.tar.gz
[root@mysql01 /software]#
[root@mysql01 /software]#
[root@mysql01 /software]# tar -zxvf RoseHA-11.2.0-1804.210416-RHEL8-x86_64.tar.gz
RoseHA-11.2.0-1804.210416-RHEL8-x86_64/
RoseHA-11.2.0-1804.210416-RHEL8-x86_64/install
RoseHA-11.2.0-1804.210416-RHEL8-x86_64/jre.tar.gz.x86_64
RoseHA-11.2.0-1804.210416-RHEL8-x86_64/resource-RHEL8-x86_64.tar
[root@mysql01 /software]# ls
rhel-8.5-x86_64-dvd.iso  RoseHA-11.2.0-1804.210416-RHEL8-x86_64  RoseHA-11.2.0-1804.210416-RHEL8-x86_64.tar.gz
[root@mysql01 /software]# cd RoseHA-11.2.0-1804.210416-RHEL8-x86_64/
[root@mysql01 /software/RoseHA-11.2.0-1804.210416-RHEL8-x86_64]# ls
install  jre.tar.gz.x86_64  resource-RHEL8-x86_64.tar
[root@mysql01 /software/RoseHA-11.2.0-1804.210416-RHEL8-x86_64]# ll
总用量 166284
-rwxrwxrwx. 1 root root    70838 4月  16 2021 install
-rwxrwxrwx. 1 root root 86739870 11月 24 2020 jre.tar.gz.x86_64
-rwxrwxrwx. 1 root root 83459072 4月  16 2021 resource-RHEL8-x86_64.tar
[root@mysql01 /software/RoseHA-11.2.0-1804.210416-RHEL8-x86_64]# ./install

                           RoseHA Installation
                       -----------------------------------
                             Version: 11.2.0-1804.210416
Components list:
        1. RoseHA Core Service
        2. RoseHA WEB Service
        3. ALL
        Q. Quit

Your Choice [1, 2, 3(def), Q]:3

Please specify the path to install, [/opt/]:
in order to make better the job that RoseHA with in oracle,sybase,etc applications,we need you config some environment variables of application runtime(you can also edit the '/etc/appenv.conf' file manually later),will you do it now? [y/n]:y

lease specify the authentication options.
Your name: mysql01
Company name: mysql02

installing.......OK
Restarting clusterd (via systemctl):                       [  OK  ]


-----------------------------------复制软件到节点二安装--------------------------------------------------
[root@mysql01 /software]# scp RoseHA-11.2.0-1804.210416-RHEL8-x86_64.tar.gz  mysql02:/software/
[root@mysql02 /software]# tar -zxvf RoseHA-11.2.0-1804.210416-RHEL8-x86_64.tar.gz
RoseHA-11.2.0-1804.210416-RHEL8-x86_64/
RoseHA-11.2.0-1804.210416-RHEL8-x86_64/install
RoseHA-11.2.0-1804.210416-RHEL8-x86_64/jre.tar.gz.x86_64
RoseHA-11.2.0-1804.210416-RHEL8-x86_64/resource-RHEL8-x86_64.tar
[root@mysql02 /software]# RoseHA-11.2.0-1804.210416-RHEL8-x86_64/install

                           RoseHA Installation
                       -----------------------------------
                             Version: 11.2.0-1804.210416
Components list:
        1. RoseHA Core Service
        2. RoseHA WEB Service
        3. ALL
        Q. Quit

Your Choice [1, 2, 3(def), Q]:3

Please specify the path to install, [/opt/]:
in order to make better the job that RoseHA with in oracle,sybase,etc applications,we need you config some environment variables of application runtime(you can also edit the '/etc/appenv.conf' file manually later),will you do it now? [y/n]:n

Please specify the authentication options.
Your name: mysql02
Company name: mysql01

installing.......OK
Restarting clusterd (via systemctl):                       [  OK  ]
webadmin/webadmin ##web管理密码
admin/admin ##Rose创建资源管理密码
vcnview 连接接登录到roseha 控制台
使用firefox 输入 https://127.0.0.1:9997
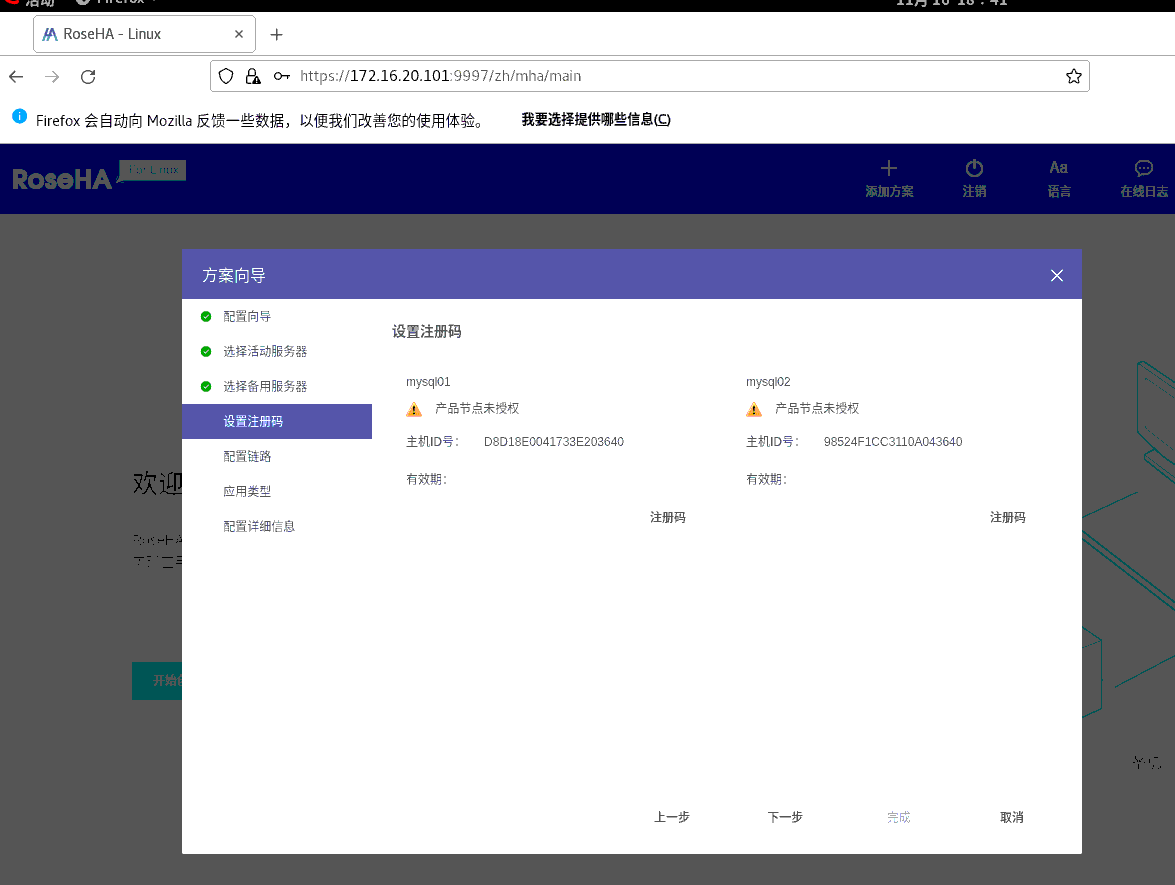
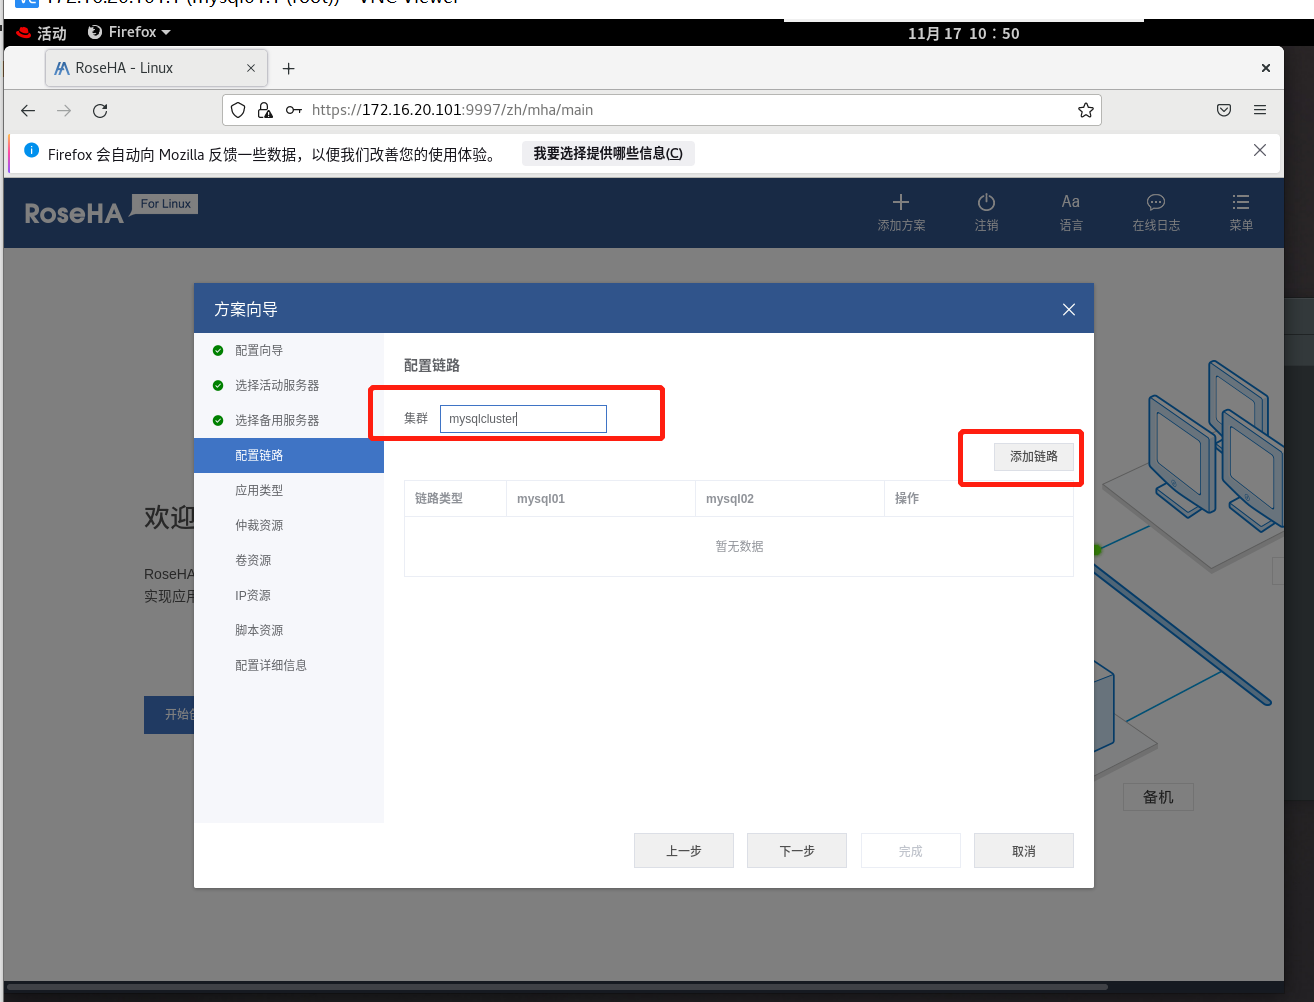
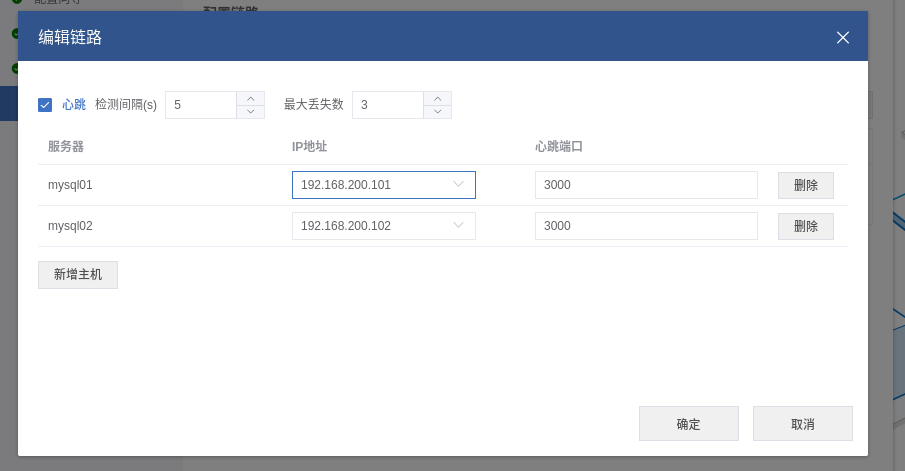
添加心跳网络
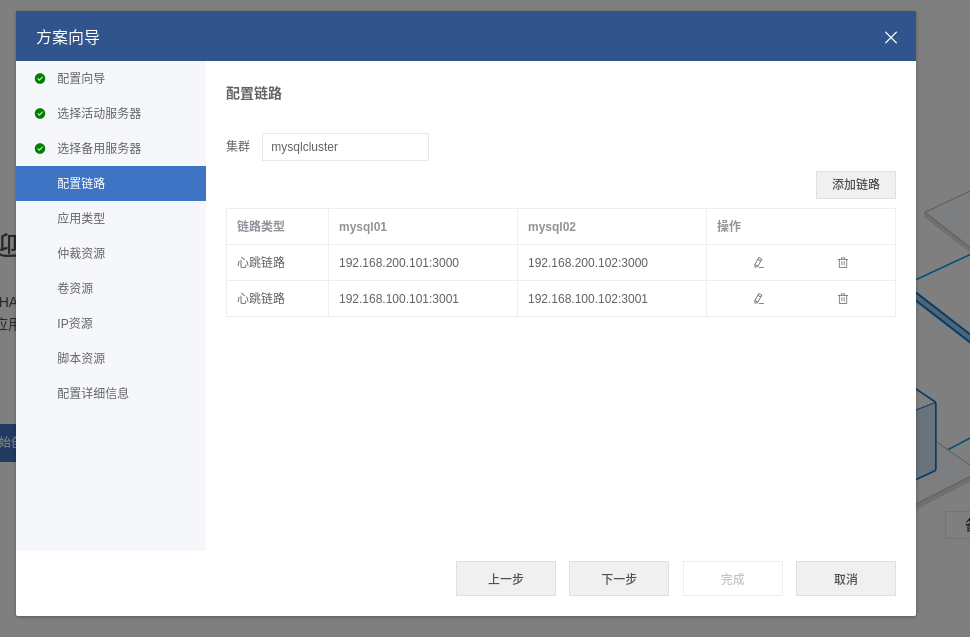
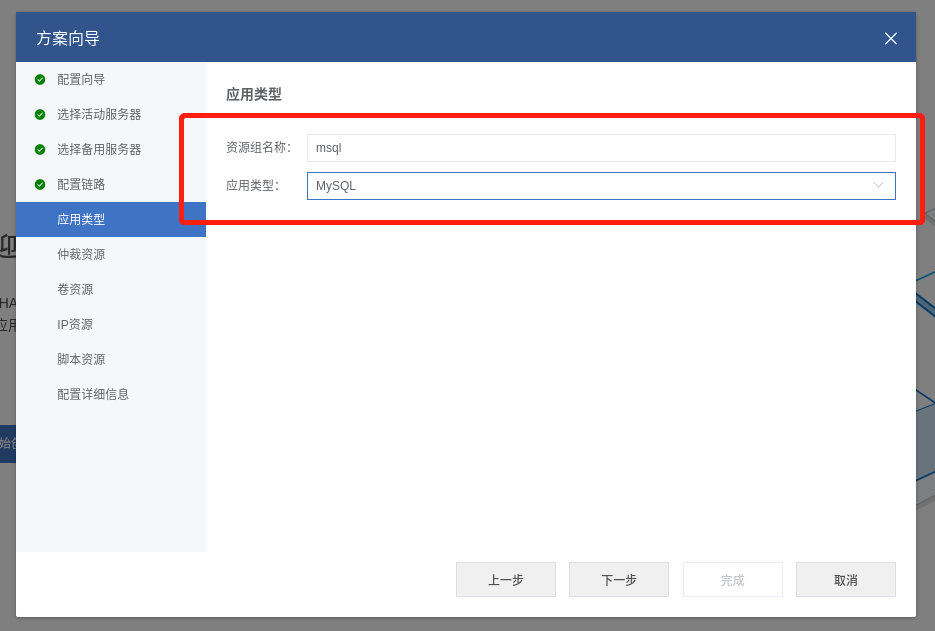
添加MYSQL资源
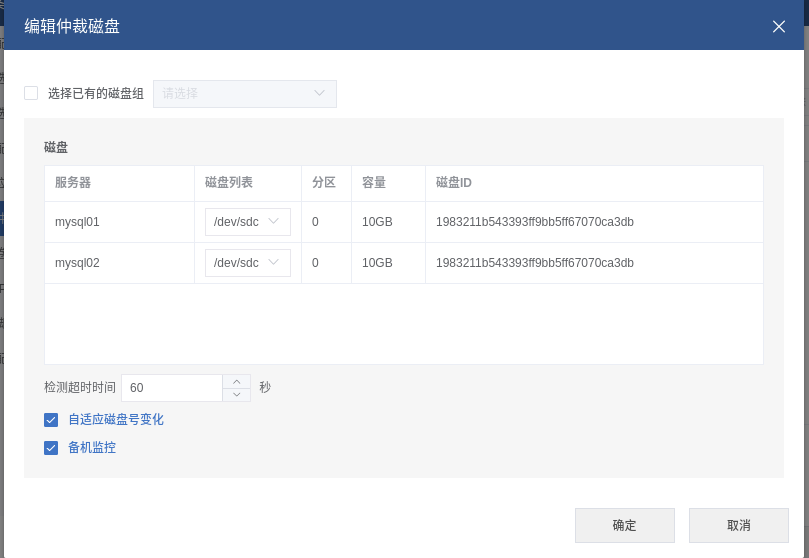
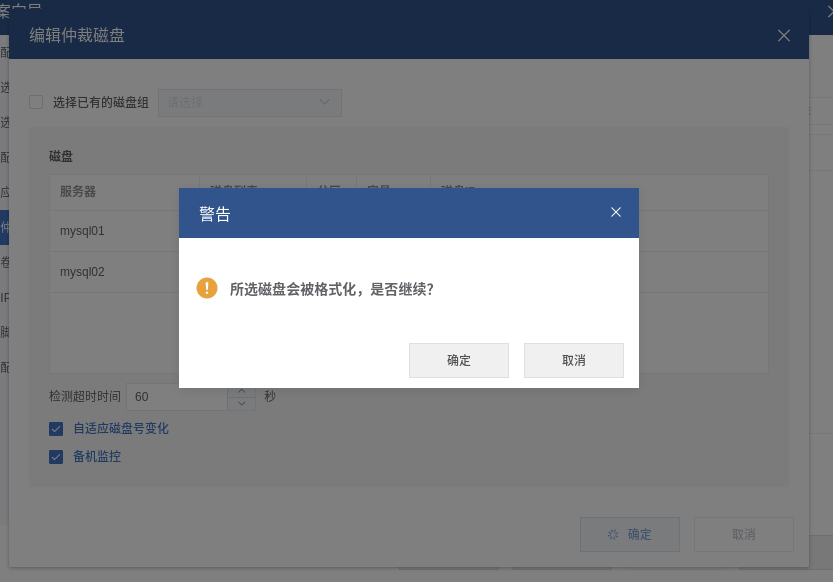
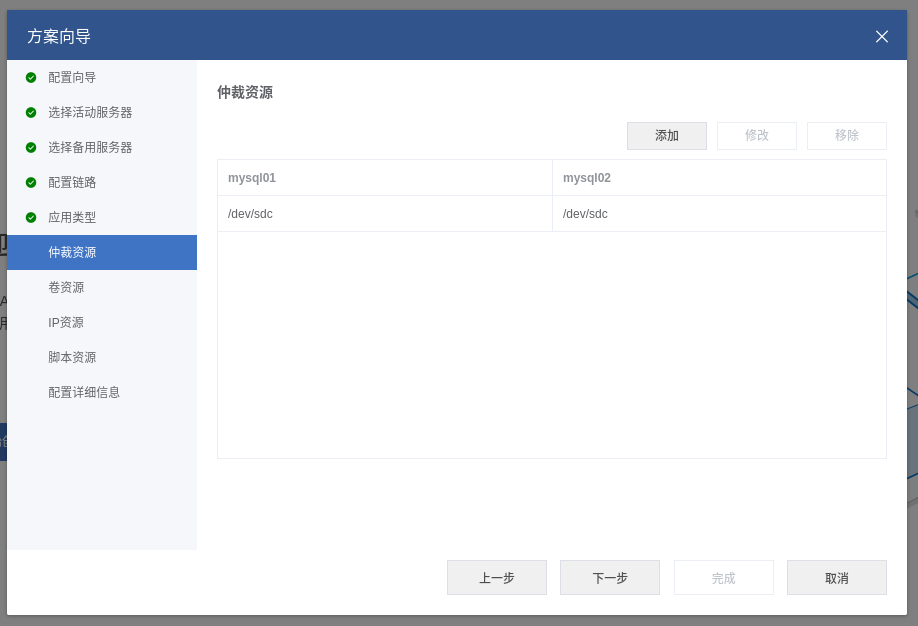
添加仲裁磁盘
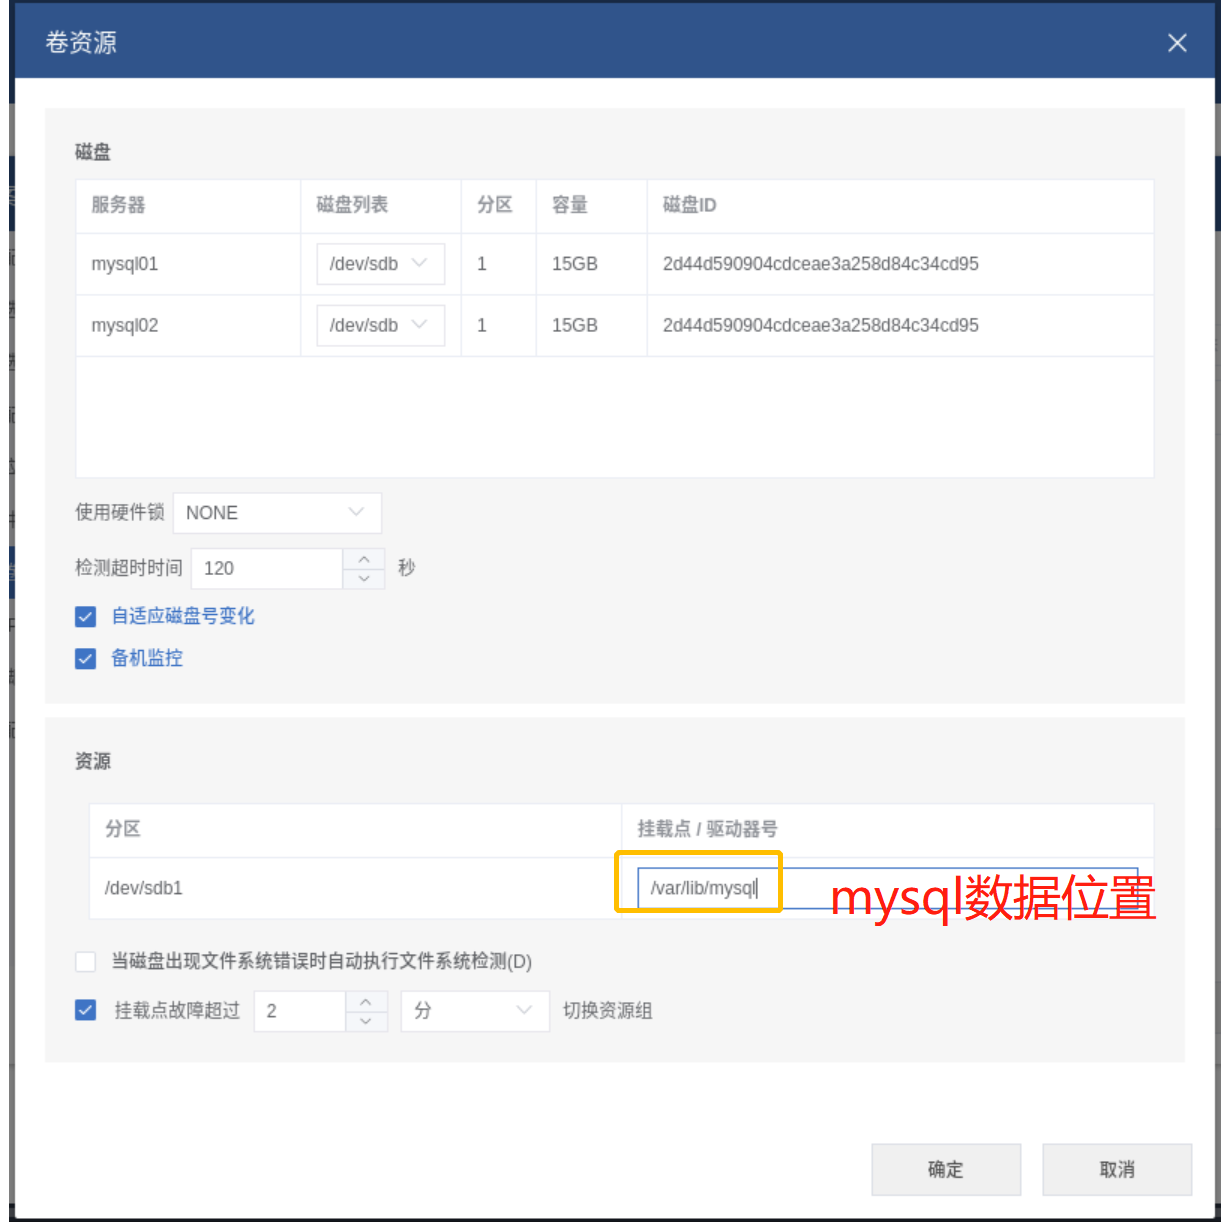
添加共享磁盘卷
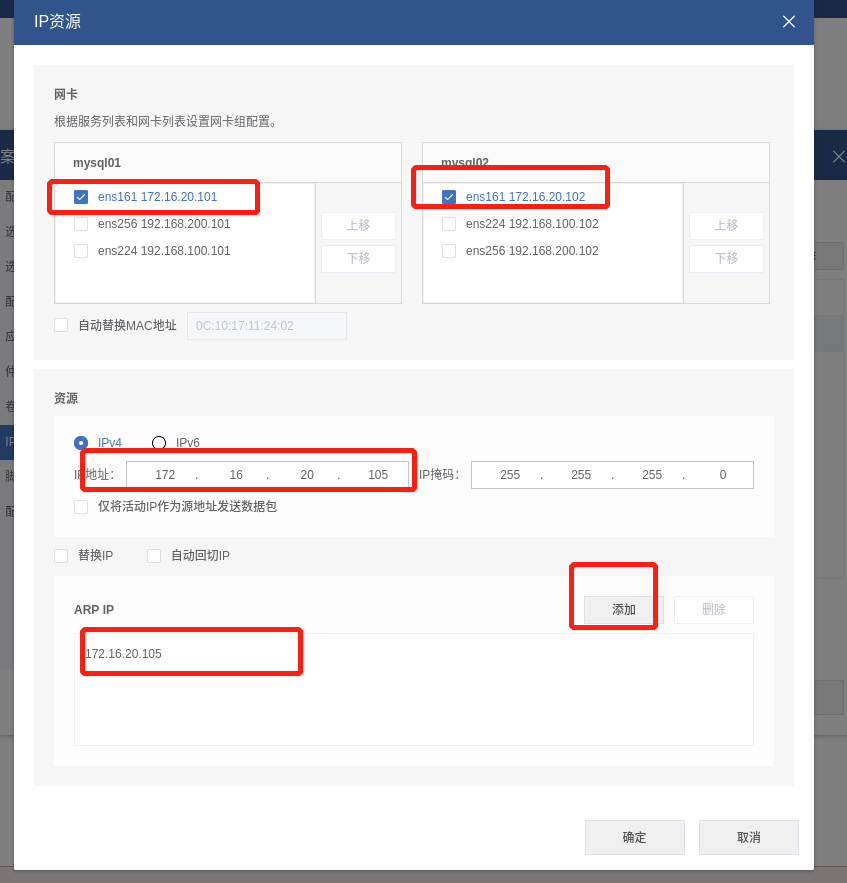
配置vip地址绑定
这一步默认
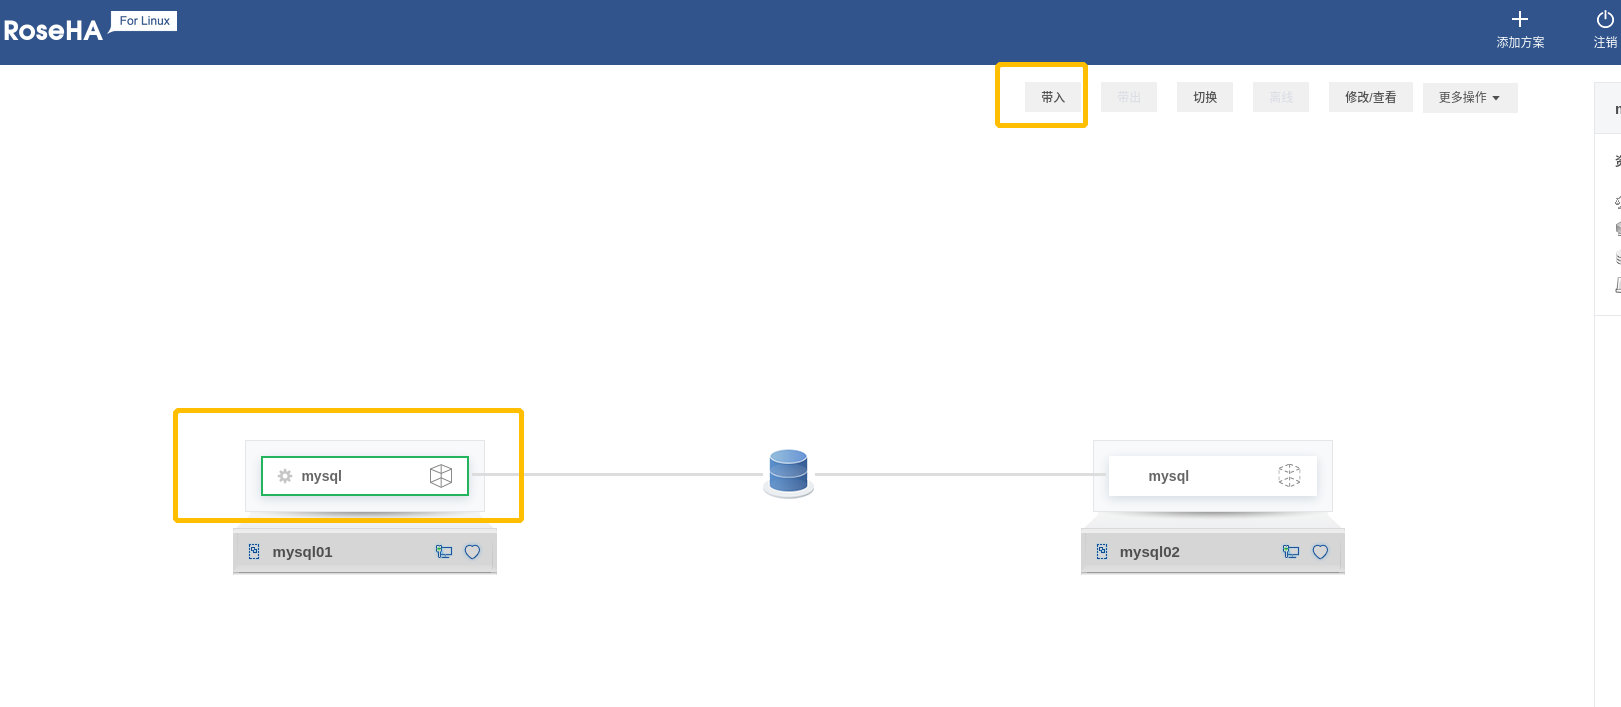
启动RoseHA资源
检查数据库的状态
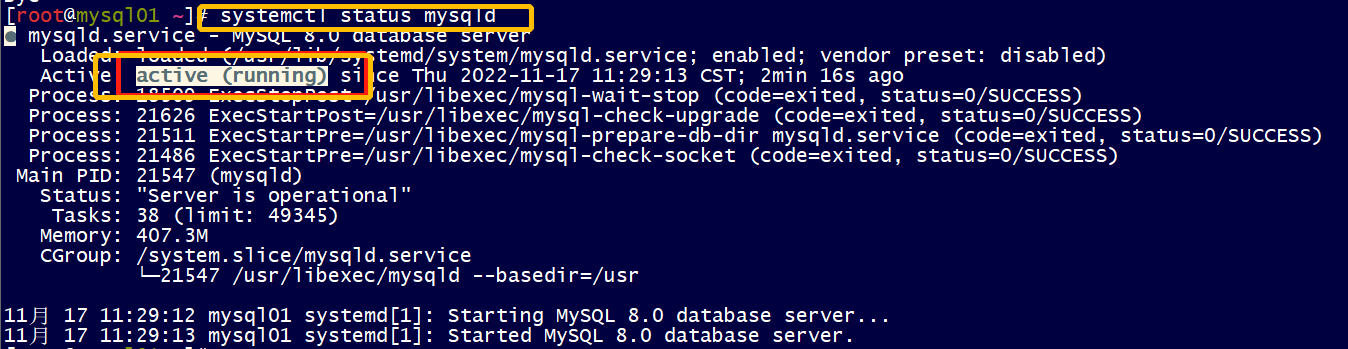
登录数据库里面查看
[root@mysql01 ~]# mysql -uroot -pAa123456
mysql: [Warning] Using a password on the command line interface can be insecure.
Welcome to the MySQL monitor.  Commands end with ; or \g.
Your MySQL connection id is 8
Server version: 8.0.26 Source distribution

Copyright (c) 2000, 2021, Oracle and/or its affiliates.

Oracle is a registered trademark of Oracle Corporation and/or its
affiliates. Other names may be trademarks of their respective
owners.

Type 'help;' or '\h' for help. Type '\c' to clear the current input statement.

mysql>
mysql>
mysql> use test;
Reading table information for completion of table and column names
You can turn off this feature to get a quicker startup with -A

Database changed
mysql> select * from t1;
+------+------------+
| id   | frist_name |
+------+------------+
|   10 | zhang      |
|  100 | wubaohua   |
+------+------------+
2 rows in set (0.00 sec)
切换测试
重启节点一测试
[root@mysql01 ~]# hostname
mysql01
[root@mysql01 ~]# reboot
查看节点二状态
 泡杯长岛冰茶
11208
泡杯长岛冰茶
7859
泡杯长岛冰茶
11208
泡杯长岛冰茶
7859
 云贝教育
5441
云贝教育
5441
 AskGuo
5419
AskGuo
5419
 1菩提行者1
4730
云贝教育
4725
1菩提行者1
4730
云贝教育
4725

 19941464235
 junle.chen@yunbee.net


点击加载更多